Red Curry of Whole Baby Chicken & Minced Prawns with Sweet Basil & Asian Vegetables

TR_RED_CURRY_OF_BABY_CHICKEN_AND_MINCED_PRAWNS_WITH_SWEET_BASIL_AND_VEGETABLES_0637
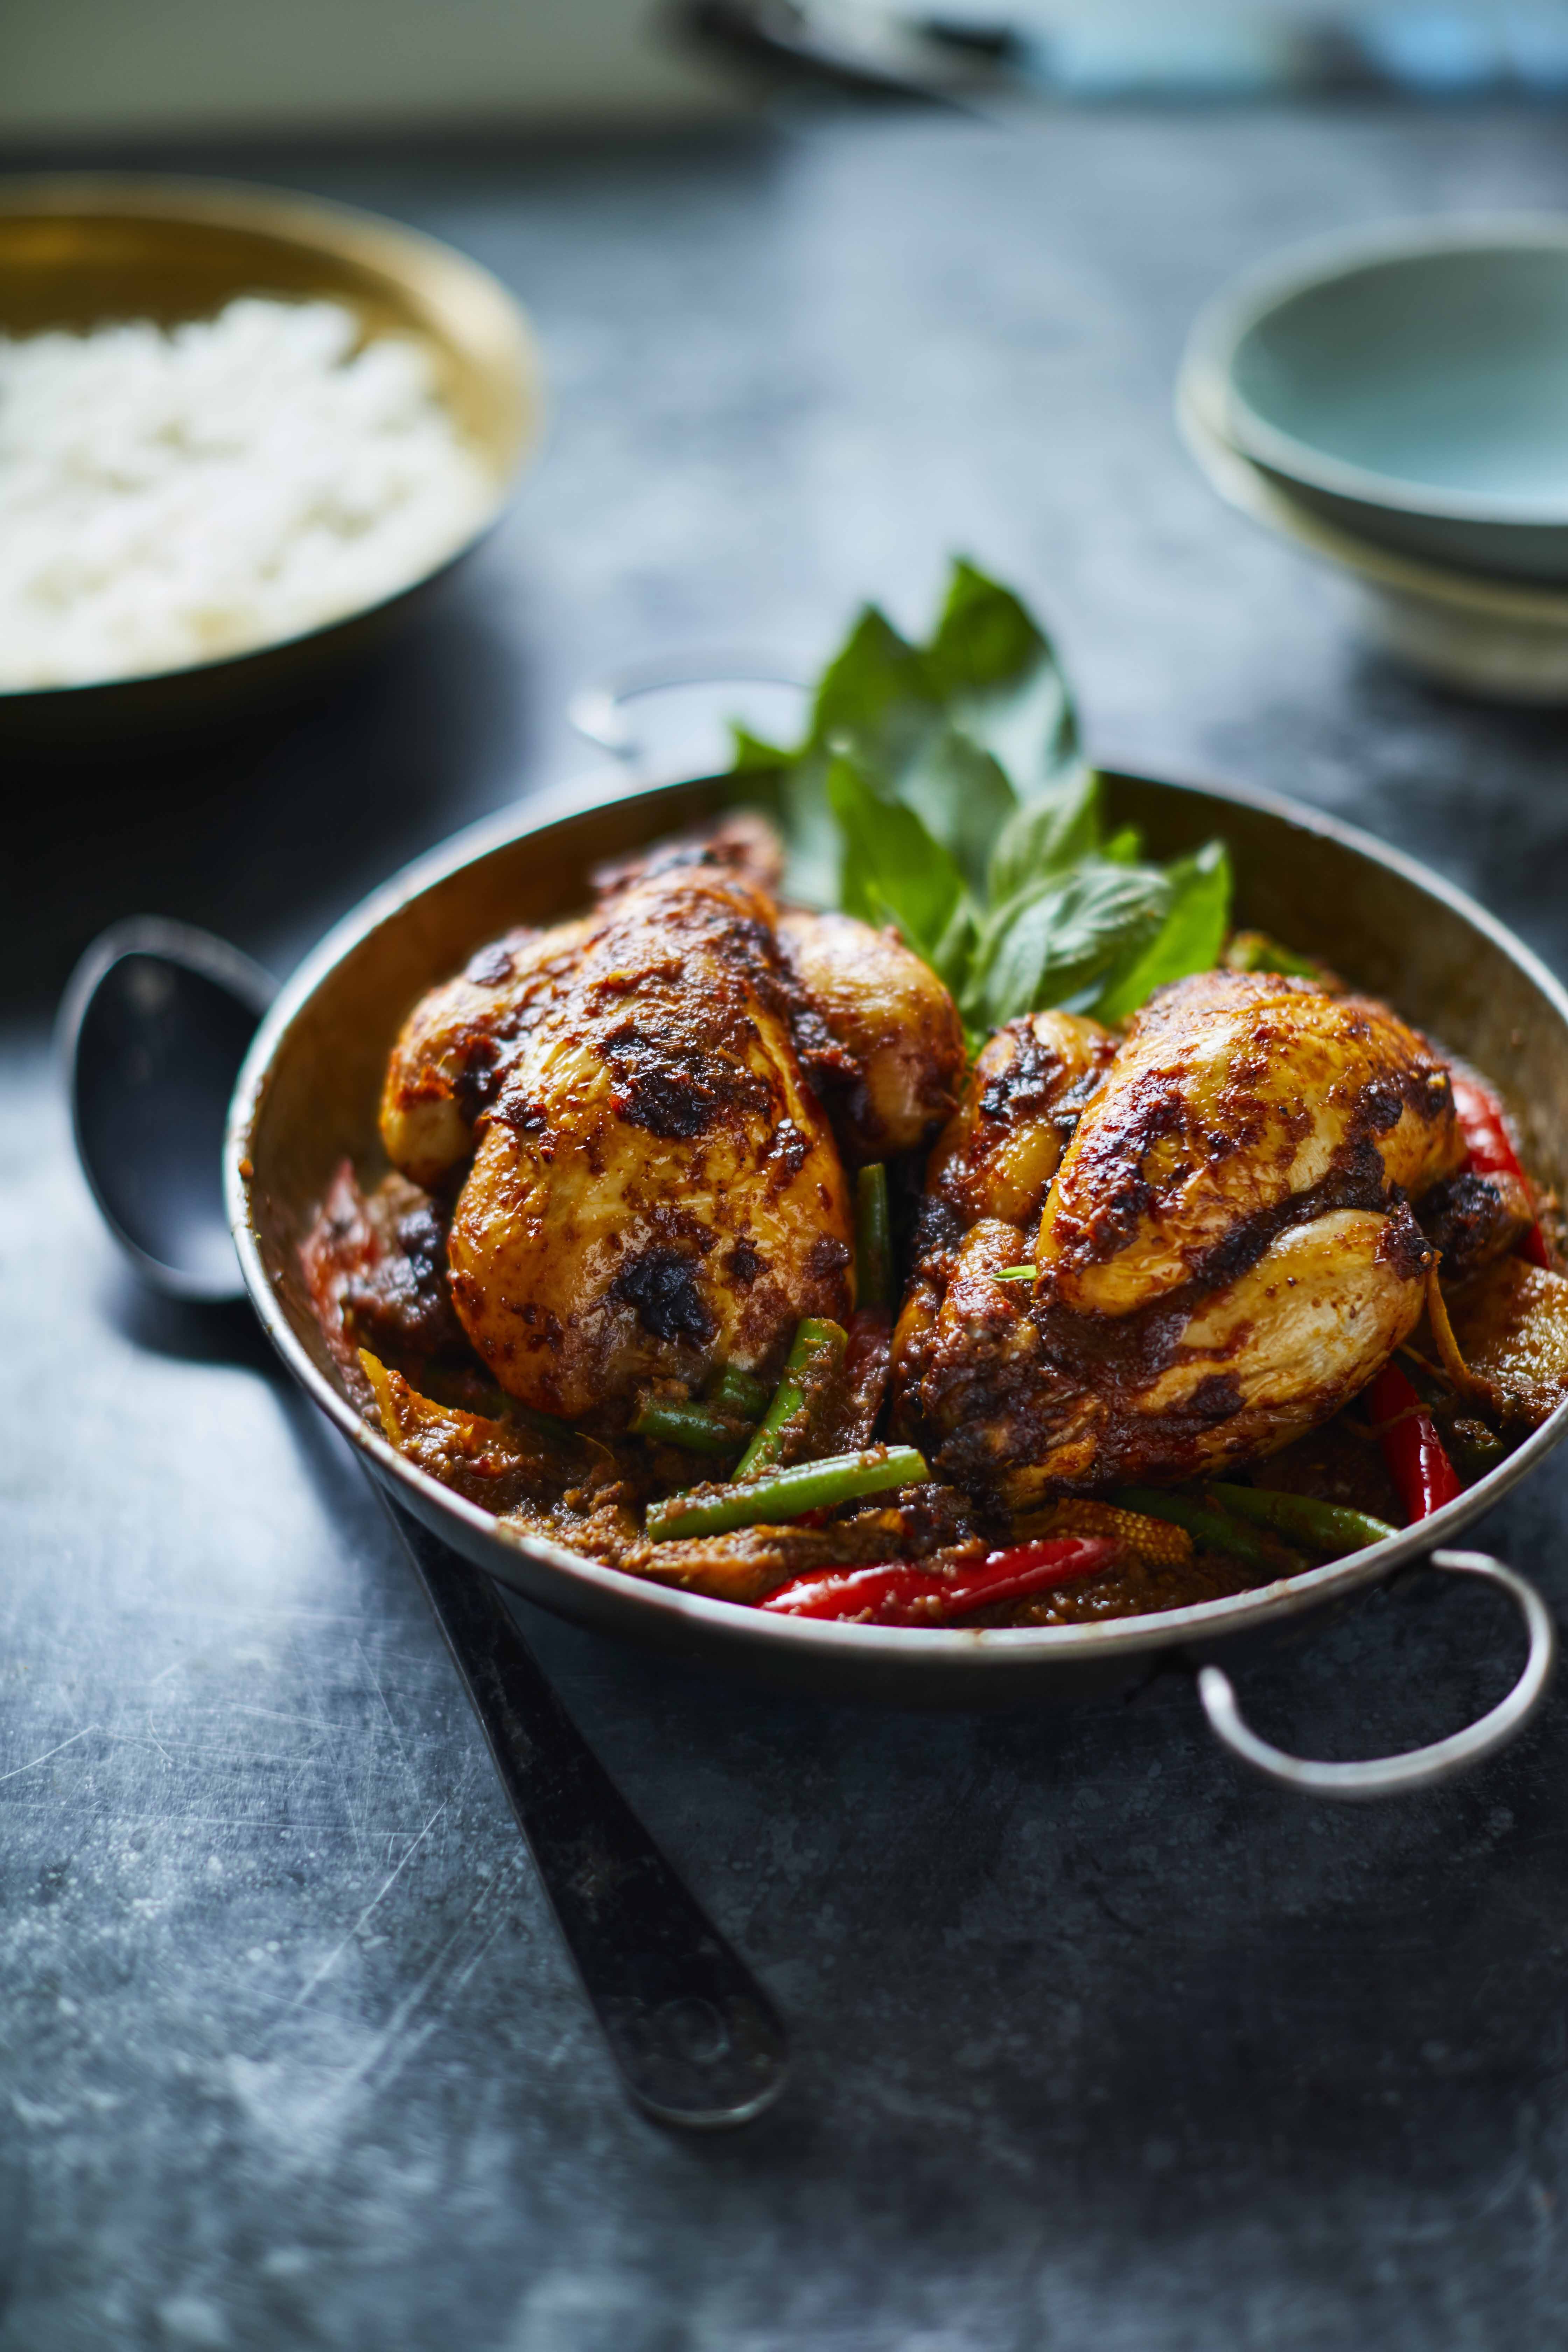
This one has been a strong favourite from customers since even the pop-up days of Farang, the whole roast chicken screams ‘roast dinner’, when marinated in a spicy red curry it screams even louder ‘Farang’. Sharing food and enjoying the experience ‘family style’ is how it’s done in Thailand and this dish is built to share so get stuck in. I’ve always used baby chicken in the restaurant to make this, which are perfect for sharing between two, however it works deliciously with larger chickens if you adjust the cooking times to suit. It’s a simple way to infuse the whole chicken with the flavours of the red curry. Serve this carved up in front of friends or family with bowls of rice and no one will be disappointed. Like in this recipe, you can cook the chicken straight away however for a fuller affect, leave the chicken marinating in red curry paste overnight before roasting.

Serves 2 / GF
1 baby chicken, roughly 250-300g
200g, red curry paste (for best results make it yourself, recipe in my book ‘Cook Thai’ 😉
1 tablespoon palm sugar
50g, prawns, shells, heads removed and de-veined, minced using a meat cleaver, keep the heads and prawns to one side
20g, baby corn, sliced into thin roll-cuts
20g, white daikon, peeled and sliced into thin roll-cuts and braised in water until (optional)
2, long red chillies, sliced into roll cuts
2, long green chillies, sliced into roll cuts
20g, green beans, topped and tailed, cut into 2cm long chunks
250ml, prawn stock, the recipe tells you how to make this
150ml, coconut oil, crack (vegetable oil can be used instead but is not as tasty)
200ml, coconut cream
2 tablespoons, wild ginger, krachai, peeled and thinly sliced (regular ginger will work too)
10g, Thai basil, picked
10g, coriander, washed and picked
2-3 tablespoons, fish sauce, to taste
1 teaspoon, sea salt

Firstly, get all the prawn heads that you collected and add them to 300ml of water. Bring this to the boil and then turn down to a simmer, make sure to skim the scum off the surface of the water, simmer for 20 minutes and then strain to produce a light prawn stock. Meanwhile heat the coconut oil in a wok, when bubbling, add the red curry paste and keep stirring and scraping regularly until paste begins to split like scrambled eggs. You will also notice that the smell of the ingredients changes from raw, to fragrant. I find as you cook out curry pastes you can smell each ingredient cooking at different times, I assume this is based on the water content of each vegetable, eventually the smell becomes one which is a clear sign that it is ready. At this point add the palm sugar and continue to scrape and cook for a further minute until the paste has darkened slightly, then add 2 tablespoons of fish sauce and allow to cook into the paste for one minute, don’t add too much as it is strong and you can always add, but never take away.

Now it’s time to let the curry out. Add 200ml of the prawn stock and 100ml of the coconut cream. Now remove half of this curry paste and allow to cool, once cool coat the chicken in the seasoned and cooked curry paste thoroughly, at this stage you can leave the chicken to marinate for a few hours, ideally overnight or you can cook straight away. Pre-heat an oven to 220 degrees centigrade and proceed to roast the chicken for 35-40 minutes until the skin is crisping and the curry paste marinade has become slightly charred and smells delicious. Check that the juices are running clear and that the chicken is hot throughout before removing from the oven. Once cooked, remove from the oven and allow to rest for 10 minutes before serving.

In the meantime, return to the rest of the cooked-out curry paste. Bring this back to a simmer and then add the daikon, green beans and baby corn. Stir to combine and then cover and bring to a simmer, cook out for around five minutes until all vegetables are cooked. At this point the curry would have thickened a little, so finish off the remaining prawn stock and coconut cream and add the minced prawns. Cook out for 3 minutes until all prawns are pink in colour and cooked throughout. Next add Thai basil, green and red chilli roll-cuts, fish sauce to taste and sliced krachai, then fold these ingredients in and serve immediately. The curry should be spicy, creamy, aromatic, sweet, fishy and salty all at the same time, adjust in the direction that suits you.

Serve the chicken whole with the prawn and vegetable curry over the top and if you like, a few sprigs of Thai basil on top for decoration, serve with steamed jasmine rice.

Cheers for reading,

Sebby Holmes Head Chef / Director, Award winning Thai Restaurant Farang London

Crispy Chilli Kale with Roasted garlic, Sweet Soy & White Pepper

TR_CRISPY_CAVLO_NERO_WITH_DRIED_CHILLI_GARLIC_SHRIMP_AND_SOY_1484

Autumn is an awesome time for produce and there is some seriously tasty stuff around at this time of year. This is a bloody easy recipe which shows off how tasty kale can be, with little to no work. Put it in a soup, stir fry, pickle it, steam it, pan fry it, deep-fry it or as I do in this recipe roast it, hell you can pretty much do anything with it if you like but I wouldn’t eat it raw, unless you’re into that kind of thing? People always say that you must wait until after the first frost to allow kale to sweeten naturally and be at its best. To this I agree, but to waiting, most certainly not! If you buy it in and it’s bitter, stick it in the freezer for a few hours, this helps sweeten and soften the leaves making them delicious to eat and easier to cook, but still don’t eat it raw even when frozen yeah!

Serves 2-3 VE

6 cloves garlic, peeled

2 teaspoons coriander roots, washed and chopped (leave these out if you can’t find them they are just an added bonus)

A small pinch coarse sea salt

100ml light Soy Sauce

1/2 teaspoon dried chilli powder

1 tablespoon soft brown sugar

500g, Kale thick stems removed and discarded, then ripped into roughly 4cm by 8cm pieces

60ml olive oil

1 teaspoon white peppercorns, toasted and spice ground to a fine powder

In a pestle and mortar or a food processor add the peeled garlic and the coriander roots and pound to a paste, using a little malden sea salt as an abrasive if needed. Next add all the other ingredients except the Kale and loosely combine. Then toss this through the Kale making sure to coat every single piece.

Meanwhile preheat an oven to 180 degrees centigrade and lay these out on large baking trays trying not to overlap too much to allow for even cooking within the oven. Place in the oven and check every few minutes until it is crisp and ready to eat, it usually takes around 10 minutes, depending on your oven. Do make sure to keep checking it regularly as if it is left for too long it will turn brown and taste bitter. The garlic should begin to cook with the leaves and fill the kitchen with the smell of roast garlic, most definitely one of my favourite smells.

Once crispy drizzle with the remaining soy mix in the bowl, making sure to strain out any raw garlic that did not go into the oven, sprinkle with white pepper and serve immediately.

Cheers for reading,

Sebby Holmes  (Director / Head Chef Farang London Ltd)

Aromatic beef braised in coconut cream and ginger

Farang-JustinDeSouza-51

In Thailand and at Farang this beef is dropped into an Aromatic curry known as ‘Gaeng Gari’, which translates as ‘curry curry’, so doesn’t really do it justice as a description really. It’s a banger of a curry and the paste recipe is in my book, ‘Cook Thai’ if you want to give it a go. This version is a bit more user friendly and once you have all the ingredients you can pretty much just bosh it in a pot and you’re off. There is nothing more appetising for the home-cook than a one pot wonder and this is certainly one to try. Using coconut cream and fish sauce instead of stock and salt to braise beef produces some seriously amazing results. This stew is one to try on a cold winters day when you need something to warm the soul, if you want to warm it a little more serve with nham pla, a ramekin full of sliced birds eye chilli and fish sauce.

Serves 2 / GF

400g, beef cheeks, excess fat removed and chopped into 3cm by 3cm chunks

2 sticks lemongrass, bruised in a pestle and mortar

4 kaffir lime leaves, torn to release flavour

2 long red chillies, bruised in a pestle and mortar

15g, Thai shallots, peeled and whole (any small, sweet shallot will do)

20g, peeled ginger, fine julienne

600-700ml coconut cream (enough to submerge the beef)

20-25ml fish sauce

1 heaped tablespoon soft brown sugar

1 heaped tablespoon of tamarind paste

10g Thai sweet basil (more common Italian basil will do)

50ml, good olive oil

1 tablespoon coarse sea salt

10g coriander, picked and washed

Begin by coating the beef in the olive oil and the coarse sea salt and mix well with your hands ensuring that all the meat gets a good coating of oil and salt.

Next in a large oven proof tray add the beef, lemongrass, kaffir lime leaves, long red chillies, Thai shallots, two thirds of the julienne ginger, coconut cream, tamarind, fish sauce and the sugar then tightly wrap the tray in tin foil to protect the contents from direct heat of the oven, all ingredients should be completely submerged in the coconut cream. Next place this tray on the middle shelf in an oven that is pre-heated to 140 degrees centigrade and cook for 5-6 hours. Once the time has passed take the beef out and check that it is cooked correctly, you should be able to break up the piece of meat with a spoon as it is so tender. The trick to this dish is low and slow, let the heat of the oven do all the work and all you need to do is assemble all the ingredients into one tray.

Once the beef is ready to come out taste the coconut broth to ensure that you are happy with the seasoning. It should be delicately sweet from the coconut cream and moreishly salty from the fish sauce, add a little more of either if you think necessary.

Once ready serve the stew in bowls topped with more julienne ginger and fresh coriander leaves, this is great served with steamed jasmine rice.

Cheers,

Sebby Holmes

Sticky pork belly with salted roast pumpkin and crispy shallots

TR_STICKY_PORK_BELLY_WITH_SALTED_ROAST_PUMKIN_AND_CRISPY_SHALLOTS_1185

Photo taken by Tom Regester from Sebby Holmes, Cook Thai, published by Kyle Books 2017

Ever since I tasted sticky pork for the first time when I started my journey in Thai food at the begging bowl it quickly become one of my favourite things to eat. It’s rich, sweet, salty yet savoury flavours make this dish a perfect one to impress friends. Me and the team at Farang like to smoke the pumpkin over cherry wood, however a salt roast is a little easier to do at home without setting any alarms off or make your house smell like a bonfire. In Thailand this is often eaten with rice and green papaya salad but its great just as it is.

Serves 2-3 people

300g, pork belly, skin removed

150g pumpkin, peeled and chopped into roughly 2cm by 2cm chunks

5g coarse sea salt

2 fresh bay leaves

1-star anise

1 x 4cm long piece of cassia bark (cinnamon sticks will do)

300g palm sugar (dark soft brown sugar can also be used)

100ml oyster sauce

50ml dark soy sauce

100ml fish sauce (depends on pork fat content and taste)

1 pandan leaf, tied in a knot and torn to release flavour (this can be left out if you cannot find one)

2 spring onions, thinly sliced

4 banana shallots, peeled and thinly sliced

500ml, sunflower oil, for deep frying the shallots

Firstly get the pumpkin and the pork belly ready for cooking. In two separate boiling pots bring some salted water to the boil, once boiling turn down to a simmer and add the whole chunk of pork belly into one pan and the pumpkin to the other. Cook the pumpkin for around 4-5 minutes and then remove and refresh under cold water, it should be softened but still very firm and holding its shape, not mushy, at this stage sprinkle the pumpkin with the coarse sea salt. Carefully cook the pork belly for around 12-15 minutes making sure not to boil the water whilst the pork is in it, the slower it is boiled the more tender it will be, remove once the pork has cooked throughout and all impurities have been cooked out of it, leave aside to cool slightly. Once cool, chop the pork into roughly 2cm by 2cm chunks.

Next make the sauce. In a separate oven proof pan add the sugar, oyster sauce, dark soy, pandan leaf, cassia bark, star anise and 50ml of the fish sauce to start. Heat all of this together gently and once melted add the chopped pork belly and stir well, making sure to coat all of the pork belly. Next place some parchment paper over the top of the pork belly mix and place in an oven at 160 degrees centigrade for 30 minutes. At this stage remove from the oven and add the blanched pumpkin and delicately fold it into the mix making sure not to mas up any pork or pumpkin, then return to the oven for a further 10-15 minutes. Check the pork before you remove from the oven it should be slightly caramelised and tender, the pumpkin should be soft and ready to serve at this point, be careful handling it as it will be soft to the touch.

Meanwhile heat the oil in a medium pan on a high heat (roughly 180 degrees centigrade), once this is hot place one piece of shallot into the oil to ensure it is not too hot, the shallot should bubble and fizz in a controlled manner, if it hisses then the oil is too hot so turn it off and allow to cool for a few minutes before going again. Fry the shallots until they are beginning to turn golden brown and then remove and strain on a clean tray with kitchen towel to get rid of all excess oil. Use a fork to pick apart the shallots as they tend to cook together in clumps, as the shallots cool they will crisp up and become perfect for garnish.

Serve the sticky pork and pumpkin straight out of the oven, topped with the sliced spring onions and the crispy shallots. For the best experience eat immediately and as suggested above eat with salad and some Thai sticky rice for mopping up all the rich juices.

Thanks for reading and I hope you like the recipe, please do let me know your comments if you cook it up, (unless you don’t like it of course, ha- you can keep that to yourself). Hopefully I’ll see you in Farang soon for a bite.

Cheers,

@sebbyholmes

(Head chef / Director of  Farang London, Highbury, London N5 2XE)

Smoked Chicken, Wild Mushrooms, Sweet Basil, Coconut & Galangal Soup

Poached chicken, coconut & galingal soup (photo by Kaleem Hyder)

Photo from Farang by Kaleem Hyder

I have just spent the weekend in sunny Birmingham at the BBC Good Food Show cooking with the Thai Embassy on the Thai World Stage to help promote Thai produce and cuisine. I’ve never been to Birmingham before, although I have to say it felt like more like Kingston, Jamaica at 34 degrees- it’s been an absolute scorcher!

The show was a good crack actually, apart from it taking place at the NEC in Birmingham which has to be one of the most boring places on the planet- it reminded me of the film ‘The Truman Show’, where you feel you will walk through a door and hit a cardboard cut out of another door if you’re not careful. All the same the show was great and I’ve come back excited to get another recipe up on ‘Articuleat‘.

In this heat I wanted to cook something quick, effortless, light and tasty as fuck so I went for this soup. This soup can be made in many different variations, a few of which can be found in my book ‘Cook Thai‘ if you ever feel like giving them a go. It only takes a few bits and pieces and around 10-15 minutes to make and all of the ingredients can be found easily in most supermarkets these days. If you’re feeling really exotic throw in some king prawns to this soup too- awesome!

Ingredients Serves 2 / Vegetarian option

1 chicken breast, skin and fat removed, sliced into rough 2cm by 2cm pieces, directions for smoking in recipe  (do not use if vegetarian, ha)

1/4 butternut squash, roughly 50g, peeled and sliced into rough 2cm by 2 cm pieces (pumpkin can be used instead)

8 Thai Shallots, peeled and slightly bruised in a pestle

2 green birds eye chillies, bruised in a pestle

2 kaffir lime leaves, torn slightly

2 sticks lemongrass, chopped into 2 cm long pieces and bruised in a pestle

10g, galangal, peeled and chopped into 2 cm long pieces and bruised in a pestle

2 coriander roots, cleaned, washed and bruised in a pestle

½ teaspoon coarse sea salt

2-3 tablespoons fish sauce (soy sauce if vegetarian)

200ml chicken stock (vegetable stock if vegetarian)

300ml coconut cream

10g, Thai sweet basil (normal basil will do)

50g, assorted wild mushrooms (I use enoki, shittaki and emoji mushrooms)

1 lime, juiced

Method

Before I get started with the recipe I’ll delve a little into explaining how to smoke the chicken. In this recipe I cold smoke my chicken which can be done very easily when you’re at home. This means that I will be adding the smoke flavour from the wood to the meat, without cooking it. All you need is some smoking wood chips, a pan, a colander and some cling film. Place a small handful of wood chips into the pan and heat the pan up until the wood chips set alight within the pan. Once this happens put the flames out with a little water, this will cause the chips to smoke heavily. at this stage place the chicken in the colander and then put the colander upon the smoking pan, then quickly cling film the whole thing so it is air tight with no smoke leaving the cling film. This will leave the chicken inside a smoke vacuum, with minimal oxygen so the wood chips will not be hot but will smoke a lot. If this is left untouched for 20 minutes the smokey flavour would have penetrated the meat, the longer you leave it the smokier the flavour.

Firstly, in a small sauce pan bring a little water to the boil and then submerge the squash into it, then turn down to a simmer, continue to gently cook for around 3-4 minutes until soft but not quite cooked and then remove from the heat and put aside for a few minutes (at this stage you might as well leave it in the hot water as we are to use it straight away).

Next place the chicken stock, 100ml of the coconut cream, 2 tablespoons fish sauce, sea salt, galangal, coriander roots, birds eye chillies, lemongrass, lime leaves, butternut squash and Thai shallots and mushrooms into a medium sauce pan and bring to a simmer. Once simmering add the chicken pieces and continue to cook gently for 4-5 minutes until all chicken is cooked and all vegetables have softened with flavours infused.

Finish by adding the rest of the coconut cream and the sweet basil and the dishing out into bowls. Lastly check the seasoning, it should be creamy, salty, a little spicy, aromatic with a fresh hint of lime at the end, adjust if needs be.

Thanks very much for stopping by at ‘Articuleat’ and I hope you have enjoyed your stay. I always look forward to your feedback so please don’t hesitate to get in touch for any reason whatsoever – I will reply as swiftly as possible.


See you next time,

Cheers,

Sebbyholmes


Green Curry of Mussels, Monkfish, Wild Ginger, Asian Vegetables and Sweet Basil with Vermicelli Noodles


#thaifood #greencurry #londonrestaurants #sebbyholmes

Photo taken by Yavez Anthonio

The last year has been absolutely mental, Farang has gone from having one street food stand in a market in Brook Green (which is literally at the point where I wrote my last Articuleat post) to having a range of street food stands across London, to now having a restaurant in Highbury and a book, ‘Cook Thai’ that has just been released across the country. The time has finally come for Articuleat to begin again, this blog is for all the bits and bobs that are worth a mention, my little corner of the internet for recipes banter and bullshit- welcome to it.

Ingredients (Serves 2-3 / GF)

For the curry

2kg, large mussels, washed, beards and barnacles removed

200g, monkfish, skinned and sliced into 2cm thick chunks

150g, thin rice vermicelli noodles, blanched for 1 minute in boiling salt water and then refreshed under cold running water

20g, baby corn, sliced into thin roll-cuts

20g, white daikon, peeled and sliced into thin roll-cuts and braised in water until softened (about 5 minutes)

3, long red chillies, sliced into roll cuts

3, long green chillies, sliced into roll cuts

10g, green beans, topped and tailed, cut into 2cm long chunks

150g, green curry paste

200ml, fish stock

150ml, coconut oil (crack)

300ml, coconut cream

1 tablespoon wild ginger, grachai, peeled and thinly sliced (regular ginger will work fine)

20g, Thai basil, washed and picked

10g, coriander, washed and picked

2 tablespoons, fish sauce

1 teaspoon palm sugar

1 lime, chopped into cheeks for garnish

½ teaspoon sea salt

For the curry paste (makes around 1kg of paste)

150g, fresh birds eye chillies, stems removed, roasted over a barbecue or in an oven for around 10 minutes until softened and a little smoky

150g, fresh long green chillies, stems and seeds removed, thinly sliced, roasted over a barbecue or in an oven for around 10 minutes until softened and a little smoky

250g, banana shallots, peeled, roughly chopped (use Thai shallots if possible)

250g, peeled garlic

100g, peeled lemongrass, topped and tailed, outside shell removed, sliced into small chunks

30g, galingale, peeled and cut into small chunks

20g, coriander roots, cleaned and finely sliced

30g, fresh red turmeric, peeled (watch the hands, this stuff stains)

20g wild ginger, krachai, peeled and roughly chopped

1 tablespoon, roasted gapi paste, fermented shrimp paste (leave this out if vegetarian)

1 tablespoon, whole white peppercorns, lightly toasted in dry pan

3 teaspoons, whole coriander seeds, lightly toasted in dry pan

2 teaspoons, cumin seeds, lightly toasted in dry pan

2 pieces, roughly 2g, mace, lightly roasted in pan

1-2 teaspoons coarse sea salt

Method

Firstly make the curry paste. Using a pestle and mortar individually pound up all the fresh ingredients separately until they are combined into one complete paste. For example, start with the lemongrass, as it is tough, chop it into small chunks to make it easier on yourself then pound using a pestle and mortar until all is mixed into one paste. Next pound the galangal, as it is also tough, using the same process, then the chillies, garlic etc. Once all are pounded individually, combine them in the pestle until they are all together as one paste.

Meanwhile toast the spices in a pan. However, bear in mind that these all toast at different rates so start with the coriander seeds, moving constantly, as soon as they start to smoke a little add the mace and cumin. Keep moving these for one more minute and then add the whole white peppercorns and remove from the heat. The heat from the hot spices is enough to toast the white peppercorns, if they remain on the heat they will pop and explode. Once toasted, spice-grind these spices to a fine powder and pound them into your curry paste. Keep pestle and mortaring away until you are left with a slightly moist, slightly coarse paste, with no identifiable chunks of any ingredients, everything should be equally pounded into a paste with no lumps.

Store the paste in an air tight container with cling film acting as a barrier against oxidisation. In a fridge, the paste will last for 2-3 weeks. It will slowly lose flavour over time, the paste turning brown in colour is an obvious sign of oxidisation which will change the flavour. 

Next, heat the coconut oil in a wok, when bubbling, add 200g green curry paste and keep stirring and scraping regularly until paste begins to split like scrambled eggs and darkens slightly. You will also notice that the smell of the ingredients changes from raw, to a fragrant, as all the ingredients cook together as one. At this point add the palm sugar and allow to cook into the paste for one minute until the paste darkens slightly as the sugar caramelises.

Now it’s time to let the curry out. Add all the fish stock and half of the coconut cream, the daikon, green beans and baby corn. Stir to combine and then cover and bring to a simmer, cook out for around five minutes until all vegetables are cooked.

Next drop in the monkfish tails and the mussels and put the lid back on to simmer for a further 3-4 minutes until the monkfish is cooked through and the mussels have all opened, discard any that remain closed. At this point the curry would have thickened a little, so finish off the remaining coconut cream and the fish sauce. Lastly, add Thai basil, green and red chilli roll-cuts, fish sauce to taste and wild ginger, fold these ingredients in carefully as you don’t want to destroy the fish, then serve immediately.

Serve the curry in a bowls, place portions of the cooked noodles in the bowls and then serve the loose curry over the top of the noodles. The curry should be thick enough to coat the noodles, rich, creamy, salty, spicy and fishy, the magic is in the balance.

Thanks for stopping by at Articuleat and I hope that you have enjoyed your stay. I always look forward to your feedback so please don’t hesitate to get in touch for any reason whatsoever – I will reply as swiftly as possible.

See you next time,

Cheers,

Sebby Holmes


#greencurry #thaifood #londonfood #farang

Photo taken by Yavez Anthonio


Sticky Mango & Condensed Milk Rice with Salted Black Sesame

Mango sticky with condensed milk & salted black sesame seeds #1 (photo by Kaleem Hyder)

Photograph taken by Kaleem Hyder @ka1eem

The first time I ever tried a sticky mango, otherwise known as ‘Khao Niaow Ma Muang’, if your Thai isn’t non-existent like mine, was in my early days working at The Begging Bowl in Peckham.  It’s the type of thing that you put in your mouth and think “where the fuck has this been all my life? More please!”


For this reason, when making this dessert for friends be careful as I made it a few times at Brook Green Market and people seem to get addicted to it. At first I kept running out because all the other traders were eating it, then the more I made the more customers brought it, I literally couldn’t make enough. Its, got a naughty, rich sweetness to it from the coconut cream and condensed milk, topped with a seemingly healthy slice of fresh mango it couldn’t be more moreish.

I know a few of you might be trying to eat healthily after Christmas but I assure you won’t regret trying this one. If you are looking for a slightly healthier option just add more mango, that counts, right?

Now before I go any further I have a little late announcement to make for those of you that haven’t heard already. My restaurant concept ‘Farang London’ is now up and running and gearing up for taking residency around the Borough area later this year. In the meantime, we are hosting four course pop-ups at The San Daniele Highbury once a month, the next one is on the 31st January 2016 (book via info@faranglondon.co.uk). For current news, pictures and all that kind of stuff keep your eyes peeled for @farangLDN on Twitter and Instagram.

Find out a little more about it here in Ben Norum’s article from the London Evening Standard:

Now that’s enough about me here is the recipe. I hope to feed you in one way or another soon.

Ingredients

  • 200g, glutinous rice
  • 2 ripe mangoes (soft to the touch but not bruised)
  • 400ml coconut cream (tinned or follow recipe to make yourself on page?)
  • 50ml, condensed milk
  • 150g, caster sugar
  • 5g, toasted black sesame seeds
  • 1 pinch, table salt

Method (serves 4)

  • Wash the rice by putting it in a sieve and running cold water over it for 1 minute. Then soak the rice, submerged in warm water for 20 minutes. In the meantime, set up a rice steamer (a pan half filled with a colander on top can work, once water is boiling cling film the colander to create a steamer), when it is boiling turn down to a medium heat and add the soaked sticky rice and begin cooking. This should take around 20 to 25 minutes to cook throughout, be sure to check that the grains are soft throughout before removing from the steamer. Remember to check that the rice is not blocking all the holes in the steamer before you put the lid on otherwise the steam wont surround the rice and it will not cook.
  • In the meantime, heat the coconut cream, condensed milk and the caster sugar to a medium heat to melt sugar and loosen the coconut cream. At this stage its also delicious to add a bruised stick of lemongrass and allow to infuse. Once warm add the cooked sticky rice, combine using a whisk and cling film the container, the remaining heat in the container from the hot rice will aid the rice in absorbing the sweet coconut liquid. Leave this closed for at least 10 minutes to ensure it has come together, it should be a thick, rice pudding like consistency.
  • In the meantime, warm the black sesame seeds in the oven, not for long, around 2 minutes at 180 degrees, then remove and sprinkle with salt.
  • Lastly, peel the mangoes by firstly removing the skin. Next slice an end off to the stone so you can see the location of the flat sides of the stone with your eyes, imagine the mango has a flat, oval shaped disk in the middle of it, this is what you want to remove. Next carefully run a small knife along the flat sides of the mango, moving the mango with one hand as you gently guide the knife to separate the flesh from the stone with the other. Once you have all 4 halves, slice them into bite-sized chunks.
  • Plate up by placing the sticky rice in the center of the plate with the slice mango prettily place over it,  finish with a pinch of the salted black sesame seeds over the top.

Mango sticky with condensed milk & salted black sesame seeds (photo by Kaleem Hyder)

Photograph take by Kaleem Hyder @ka1eem

Thanks very much for stopping by at ‘Articuleat’ and I hope you have enjoyed your stay. I always look forward to your feedback so please don’t hesitate to get in touch for any reason whatsoever – I will reply as swiftly as possible.


See you next time,

Cheers,

Sebbyholmes


Smokey, Spiced Red Curry Sausage, Lime Leaf & Wild Ginger with Gola Curry Dip

photograph taken by Zeren Wilson @bittenandwritten

photograph taken by Zeren Wilson @bittenandwritten

Did you know that every time a human being is born onto this planet, statistically three sausages are made! Scientists have coined it the ‘three baby sausage ratio’. Now that, is in absolutely no way true (well, I don’t think it is?), but at least I’ve caught your attention now.

This is an absolute banger of a dish, smokey, salty, spicy, sweet and sour, everything a person with a taste for Thai would expect in a meal. Now it’s a pretty lengthy dish to create given that two curry pastes need to be made in order to make the red curry for the sausage and the gola curry for a dip. However I have three reasons that may persuade you to go through the efforts to complete the whole recipe. Firstly, it tastes bloody great, secondly both the red and the gola paste can be kept in the fridge for use in an endless array of other delicious recipes, and lastly if you really can’t be arsed to cook the whole thing but Zeren’s lovely picture is making you want to eat it, just make the sausage and serve with some sweet chilli sauce and herbs, I guarantee you’ll still love it.

There are a couple more optional extras in this dish which you can avoid if you’d like to, as there are simple short cuts (although as you know if you read my blog, I always urge you to try the long way at least once, you can taste the difference). Firstly, I made my own coconut cream to use within the gola curry whilst cooking it out. This obviously takes a little longer than opening a tin, however the difference in taste is phenomenal, if you’ve never tried fresh coconut cream before, think about the difference in taste between a fresh pint of milk and those little sachets you get free in hotel rooms – you get the idea. Now don’t get me wrong, we don’t all have the time to make our own coconut cream all the time, but it’s definitely worth having a mess around with.

Just bare in mind that in order to complete this recipe with success its important for you to purchase a heavy, granite pestle and mortar. When making any curry paste, the objective is to combine flavours with brute force. Therefore a heavy weighted pestle and mortar is the fastest way to victory. Trust me, I first brought a wooden one for use at home and I spent entire evenings bashing coriander root until my hands hurt and I swear it just got bigger. Right then lets get started.

Ingredients

(serves around 3/4 people, makes 12-15 sausages)

When weighing ingredients for these curry pastes I use a small cup (this holds roughly 300ml’s of liquid), this makes more than enough paste for this recipe, however its worth making a little more if you’re going to put in the effort to make it properly.

(for the red curry paste)

-5 cups, large dried red chillies, soaked in warm water to soften, drained, de-seeded

-6 cups, peeled garlic cloves

-6 cups, peeled banana shallots

-5 cups lemongrass, outer sheath’s remove, topped and tailed

-3 cups, peeled galangal

-2 cups, coriander root, cleaned

-1 cup, roasted gapi paste (fermented shrimp)

-45g, white pepper, toasted and spice ground to powder

-45g, coriander seeds, toasted and spice ground to powder

-45g, cumin seeds, toasted and spice ground to powder

-large pinch of coarse salt

(for the gola paste)

-1.5 cups,  large dried red chillies, soaked in warm water to soften, drained, de-seeded

-1/2 cup, cleaned coriander roots

-2.5 cups, peeled banana shallots

-2.5 cups, peeled garlic

-2.5 cups, peeled ginger

-2.5 cups, desiccated coconut

-1 cups, roasted peanuts

-large pinch of coarse salt

(for everything else)

-1kg, smoked pork belly mince, ask a butcher to make it roughly 20% fat, to 80% meat. If you cant get hold of smoked pork belly then just cold smoke it yourself in a closed barbecue. I will make sure to pu up a post explaining a few simple ways to do this over the next few weeks)

-Kaffir lime leaf, jullienned, finely chopped

-200ml, coconut cream

-50ml, vegetable stock

-150g, palm sugar (soft brown sugar will do)

-200ml, fish sauce

-100g, kra chi, wild ginger, peeled and thinly sliced

-a little cooking oil

-a few thai shallots, peeled and thinly sliced for garnish

-a few picked and washed coriander leaves for garnish

-a few semi chopped nuts for garnish

Method

  1. Firstly let’s make the coconut cream. Start by cracking the coconuts with a hammer and remove and discard the outer shell. This leaves you with the inner flesh of the coconut which has an inedible skin attached to it. Using a peeler remove this skin to leave you with only the fresh, white coconut flesh. Next put this flesh through a mincer, or grate it and add to the boiling water, combine thoroughly using a stick blender for around 5 minutes. Once combined filter the liquid from the flesh by ringing it out in some muslin, or a cloth. Once separated place the liquid in the fridge and leave to cool. As it cools the cream will separate from the water, the white cream on the top is what you want. Keep the coconut water as it can be used to let out curries and soups. Any leftover coconut cream can be boiled down until it splits (cracks); this can then be used as coconut oil (coconut crack) which we will talk about another time. Once finished take some of the grated coconut left behind and toast on a medium heat in the oven, until golden brown and crunchy.
  2. Secondly, lets get those curry pastes made. As i say the important thing is to have a heavy pestle and mortar. When making a curry paste, begin by pounding each ingredient individually, starting from the toughest, then remove from the pestle to clear way for the next ingredient. After they have all been individually pounded, add them all back into the pestle and pound until it resembles one paste, you may have to do this in a couple of batches so it fits easily into the pestle. pound in the order of dried chilli, lemongrass, galangal, ginger, shallot, garlic, coriander root, peanuts, coconut, gapi paste, using the salt as an abrasive throughout. This list includes ingredients from both pastes, but do remember to first complete the red paste, then put aside. Then complete the gola paste separately as they are two separate pastes.
  3. right so now we have our cream and pastes, the hard bit is complete, lets make the sausages. In a pan, gently melt 150ml of the fish sauce with 150g of the palm sugar, then put aside to cool. Next In a mixing bowl add the pork mince, fish sauce and palm sugar mix, 400g red curry paste, all the sliced wild ginger (kra chi) and mix well. Once mixed roll into sausage shapes using cling film and leave in the fridge for at least 20 minutes to set shape (these can be as thin or fat as you like, its your dinner). once set in shape, poach the sausages in simmering water to a core temperature of around 64 degrees (medium rare), if you don’t like pink pork take it as far as you like, depends how much you trust the quality of the meat. Once these are poached either put them straight on a barbecue or grill and cook the outside until the whole sausage has gone a lovely golden brown colour with some char, or place them in an ice bath to cool quickly, then leave in the fridge for cooking at a later date (they also freeze well).
  4. In the meantime, cook out the gola dipping sauce. This curry is best cooked slow, over around 45 minutes, this way you can add depth and richness to the curry. To begin, pour roughly around 100ml cooking oil into a pan and heat to a medium/high temperature. Once hot add 300g of the gola paste to this oil, this should make a sizzling sounds as it touches the pan as we want to fry the paste. Keep the paste moving with a metal kitchen spoon, being sure to scrape anything that sticks to the bottom off quickly before it goes black. It is correct for this paste to stick a little more that usual as its packed full of peanuts and they are a bit of a bastard to fry. However, if you keep a watchful eye, and regular movement, you will be fine. After around 20 minutes the paste will begin to go a little darker, this is a sign that its ready to add palm sugar. Add the sugar and turn down the heat, keep stirring for around 5 minutes until the sugar is melted and beginning to caramalise, which will make the paste a little darker. Once melted add the remaining fish sauce to the, followed by all the coconut cream and stock, keep the paste simmering on a medium heat for another ten minutes and re-season if you feel it necessary, the gola should taste sweet, salty and mildly hot.
  5. To serve, place the gola in a bowl and top with semi chopped/pounded peanuts, sliced Thai shallots and coriander leaves. Pile sausages up next to sauce (with wooded skewers in if you want to make it finger food) and then eat.

Thanks very much for stopping by at ‘Articuleat’ and I hope you have enjoyed your stay. I always look forward to your feedback so please don’t hesitate to get in touch for any reason whatsoever – I will reply as swiftly as possible.

See you next time,

Cheers,

Sebbyholmes


Pomegranate Miang with ginger, chilli, lime, peanuts & toasted coconut

Photography by Zeren Wilson, @bittenwritten

Photography by Zeren Wilson, @bittenwritten

Wow, even looking at my own words feels like a blast from the past these days, it seems I have truly mastered the art of consistently inconsistently writing- absolutely nailed it!

Now I’ve had bloody busy year, however I still can’t really Justify not putting up a post for nearly a year and a half, that’s mental. So I’ll attempt to give you guys an overview of my year in a nutshell, I will also try my utmost hardest to finish this post before I’m 40 and before you guys are bored to death of my bad English, typo’s and made up words.

Right so where was I when I last shared a recipe? Bloody hell I think it was the begging bowl, seems like a lifetime ago now. I’ve since moved on to launch a Thai barbecue restaurant on Denmark Street in soho, called the smoking goat. My head chef position here was a fun experience and really pushed my chef ability above and beyond. I’ve worked with some amazing people during my time smoking goats. We successfully managed to combine a style of cooking which, I believe, is relatively saturated in London, ‘barbecue’, with a cuisine which, for me, is just birthing and shaping itself as something truly respected and delicious when it is made with love, ‘Thai food’. I’m proud of what I managed to achieve at the smoking goat, with consistent great reviews and queue’s outside the door I don’t feel there is much to complain about.

http://www.theguardian.com/lifeandstyle/2015/jan/02/smoking-goat-old-tom-english-restaurant-review

http://www.independent.co.uk/life-style/food-and-drink/features/the-smoking-goat-restaurant-review-9858355.html

http://www.standard.co.uk/goingout/restaurants/fay-maschler-reviews-smoking-goat-9840423.html

http://www.dailymail.co.uk/home/event/article-2921762/Tom-Parker-Bowles-reviews-Smoking-Goat-London.html

http://www.thetimes.co.uk/tto/magazine/article4342089.ece

me and the EatGrub lads have also been pretty busy over the last year writing our cookbook, which is now finished and out next year. Shami and Neil are still smashing it at Grub and the company is on to wonderful things. I’m still loving working with them although I may have driven them mad trying to write a cookbook at the same time as running the smoking goat (not to mention I must have drove the lads crazy at work having to put up with a mental head chef leaving insects around the office). I can tell you now as a true fact that it is not easy to write a cookbook, and run a busy kitchen at the same time. It’s incredibly satisfying to have completed the book, I’m also happy to be done with the sleepless nights cooking insects and writing recipes to the early morning (everyone knows what I mean, right?).

This now brings me on to the most recent chapter of my journey. I’ve now moved on from the smoking goat to begin my journey on my own. I’ve worked incredibly hard in this industry and have a lot of great people on my side so I’ve decided to continue in the food industry the way I want. Pestle London is currently a pop up restaurant with a key focus on making banging Thai curries and small plates, all from scratch- no peanut butter! We open on Wednesday 30th September, 19:00-22:00, Wednesday to Friday nights at sacred cafe next to Holloway Road station. It’s going to be a cool relaxed vibe, good music, good drink, and absolutely shit food (joking! I’ll try my hardest).

Right- that’s enough of my crap for at least one more year, let’s get you guys cooking. Today’s recipe is one from my menu at the moment and it’s been a hit with the customers. Miang with a sweet, salty, sour and fresh heat is the perfect accompiniment to a dinner of curry and noodles. It’s a great one for at home as you can make a mix up and then all help yourselves, easy to share and delicious. Be carful though, one of the little basterds always ends up with all the birds eye chilli in it.

This recipe makes enough for 4-5 people to snack on, if any is left just wack it in the fridge, it’ll keep for 2-3 days as long as it’s covered. You can find all of these ingredients in any good Asian supermarket, I prefer new loon moon in Chinatown for fresh goods as they have a large range of fresh goods in comparison to other shops.

ingredients

(for the miang sauce)

-150ml, tamarind water

-500g, palm sugar

-150g, fish sauce/ soy sauce if you are vegetarian

-100g, toasted peanuts, semi-pounded in a pestle and mortar

-100g, toasted dessicated coconut

-1 tablespoon dried shrimp, pounded to a floss in a pestle and mortar /don’t include if making vegetarian

-2, green birds eye chilli

-1 teaspoon, fermented shrimp paste ‘gapi’

(for the rest)

-1cm cubed, piece of ginger, peeled and diced

-6 Thai shallots, peeled and diced

-1/2 a whole lime, diced with the skin on

-2 tablespoon, toasted coconut

-3 tablespoon, semi-pounded peanuts

-2 red birds eye chillies, thinly sliced

-a small handful of coriander leaves, washed

-1 pomegranate, de-seeded and all pith removed.

-20 betel leaves/ if you can’t find any then you can use baby gem, or spinach leaves, washed

method

1.firstly make the miang sauce. In a pan heat the palm sugar, and fish/soy sauce, and the gapi paste on a medium heat, stirring regularly and making sure it doesn’t stick to the sides.

2. In the meantime, using a pestle and mortar pound the 2 green birds eye chillies. Then one by one add the rest of the dried ingredients so that they all end up making one dry mix that includes the coconut, peanut, dried shrimp and chilli. Keep heating the palm sugar and fish sauce until all sugar has melted and the sauce has just started bubbling, then add the tamarind water and temporarily remove from heat.

3. Next add the pounded dry mix that you have pre-prepared to the sauce and whisk, ensuring that you separate any clumps of dried ingredients. This makes sure that the ingredients are well distributed and helps to balance flavours.

4. Lastly add all the fresh ingredient to this sauce except for the betel leaves, mix delicately, being sure not to damage any of the ingredients that you’re mixing. Once everything is evenly distributed place a spoonful of this mixture into the middle of the betel leaves and arrange neatly on a plate. Then eat them up!

So there you have it, pomegranate miang to make at home, I hope you enjoy the recipe

Thanks very much for stopping by at ‘Articuleat’ and I hope you have enjoyed your stay. I always look forward to your feedback so please don’t hesitate to get in touch for any reason whatsoever – I will reply as swiftly as possible.

See you next time,

Cheers,

Sebbyholmes

Lightly Spiced Tiger Prawn, Sweet Potato, Daikon & Thai Basil Fritter, Served With a Green Nham Jim Dipping Sauce

Lightly Spiced Tiger Prawn, Sweet Potato, Daikon & Thai Basil Fritter, Served With a Green Nham Jim Dipping SauceFinally I’m back behind the keyboard, I have an increasingly large list of events, recipes, anecdotes and articles in the back burner for ‘Articuleat’, (I just need to find the damn time to write them up).

The London pop-up scene has swallowed me up whole at the minute, in a big pile of edible insects and Thai food. Its amazing fun! Not to mention that the Begging Bowl is busier than ever. Thai food in London is booming and why not? It’s awesome! I feel privileged to be part of it.

I will soon be updating you all with what I’ve been up to in my ‘behind the whites section’. I’ve just finished another pop-up with EatGrub at the ‘Hot House Rooftop‘ in London Fields. I’m also going to be helping Andy Oliver at his next pop-up with ‘Som Saa’, at the chilli festival ‘chilli chilli bang bang’ in Dalston Yard – all exciting stuff.

Now anyway I’m getting ahead of myself again. This recipe for you today is a fairly quick one to put together (once you have dried your own turmeric and ginger). It’s the perfect accompaniment to a hot summer’s day, which we all know should be enjoyed with a nice cold pint in one hand and a fork in the other (not that I’ve got out of the shade of the extraction fans much recently).

When I make this dish I like to make my own mild curry powder to add to my egg batter before frying. Fresh turmeric, like ginger, is a rhizome – a thick underground stem. Due to this it take a lengthy, but simple process to dry it out and grind to a powder. Both fresh spices can be dried in the same way – peel, thinly slice and dry in a warm dry place, on a drying rack for at least 24 hours (May need longer dependent on environment). You can buy pre-dried turmeric and ginger but it’s in no way as good, or even similar to the real thing, try making it you’ll love it (why not make loads and leave it in the kitchen for another day?). However, when working with red turmeric be carful, the stuff stains your bloody hands orange for days. The last thing you want is everyone thinking that you look like an ‘umpa lumpa’ from the neck down!

I also think it’s important for me to talk you through making your own chilli powder. At the begging bowl we always use dried chillies and call it ‘blue tongue’? Now that I think of it, I actually have no bloody idea why or where that came from? I’m assuming it’s something to do with the fact that it’s fucking hot and it will certainly leave you with a burning mouth if you’re not careful. Now I’m lucky when making this as for best results it should be made in a wok (which I have at work), with a wok burner (very high heat). The intense temperature of the wok smokes the chillies whilst crisping them, making them easy to spice grind into a smoky, hot powder. I appreciate that unless you are some kind of maniac, you probably don’t have a wok burner to hand at home? I have found the best way to do it at home is in a dry pan on a high heat on the stove top, keep the chillies moving until they start smoking, then cover with tin foil and place in a hot oven for 2-3 minutes allowing to smoke a little. Carful- if you breathe in the smoke, you will cough. I also like to use 50/50 dried birds eye chillies to dried long red chillies, this gives the chilli powder a fiery hot, smokey and sweet flavour. It’s great when added to the curry powder.

When grating the vegetables to make this fritter (the daikon and sweet potato), it’s important to julienne them evenly to ensure it all cooks at a similar rate when being deep-fried. If your knife skills are still in practice, I suggest using a papaya shredder, or something of similar function. For anyone that is unsure what a Daikon is, it’s a type of radish. It’s also known as ‘mooli’ or Oriental radish and is much larger than a normal radish, they can be found in most good Asian supermarkets with a fresh vegetable section. If grating daikon (which we are) it’s important to use it as quickly as possible to retain the crisp, crunchy freshness.

The natural sweetness of tiger prawns are a great accompaniment to this lightly curried fritter. Once our home-made curry powder is completed, the vegetables, prawns and Thai Basil are tossed through a light egg batter and deep-fried to make the fritters. This is then served with a sweet, sour and fiery hot Nham jim dipping sauce- delicious.

This recipe was adapted from something I was shown from Andy Oliver, it is in no way the same (or as good) but feel I should credit him anyway – cheers Bandy Boliver.

I think that’s enough from me for one day and I’m sure you guys want to get cooking so I’ll leave you to it.


Enough to satisfy two people with a light lunch:

Ingredients (leaves loads spare to use another time, scale down if you want)

(For the curry powder)

-1tbspn, black peppercorns

-3tbspn, coriander seeds

-3tbspn, cumin seeds

-1tbspn cloves

-1tbspn fennel seeds

-15, Thai cardamom pods

-15, pik kwan, stems removed

-3tbspn home made chilli powder (1tbspn dried birds eye chillies, 1tbspn dried long red chillies, follow instructions above)

-5tbspns, ground, home-made dried ginger (follow instructions above for drying)

-7tbspns, ground, home-made dried turmeric (follow instructions above for drying)

(For the Nham jim dipping sauce)

-7, peeled garlic cloves

-5, green birds eye chillies, roughly chopped

-2tbspn, coriander root, finely chopped

-3tbspn, caster sugar (might need more to taste)

-300ml, fresh lime juice (might need more/or less to taste

-150ml, fish sauce, I like the mega chef brand best (might need more/or less to taste)

-2, mandarins, juiced

(For everything else)

-6 whole tiger prawns, body shells and shit removed, tails and head still attached

-1, sweet potato, julienned or shredded

-200g, daikon, julienned or shredded

-20g Thai Basil, picked

-10g, white sesame seeds

-2, free-range eggs

-100ml sparkling water

-1tbspn, rice flour

-1pinch Malden sea salt

-2 litres, cooking oil (for deep-frying)

Method

  1. Ok so firstly let’s get the spices toasted and the curry powder made. Have all you spices separated to start, as they need to be added to the pan at different times. The ginger, turmeric and chilli powder is already good to go if you followed my instructions in the writing above. In a large flat pan toast the spices on a low heat. When toasting spices you should always heat them in terms of their size, larger spices first and for longer ( as a larger object takes longer to toast). Once a spice begins to change colour and release a fragrant smell it is ready to use. The only spices that should not be toasted according to size are peppercorns as they pop and explode, just add them at the end and let the other spices warm them through. One toasted, add the ginger, turmeric and chilli powder then spice grind together to make the curry powder.
  1. Next make the fritter, heat the oil in a deep pan to 180 degrees. In a mixing bowl whisk together   1tbspn of the home-made curry powder, 1tbspn of rice flour, 1 pinch of Malden sea salt, the sparkling water and the eggs, beat to a pale mixture then rest in the fridge for a few minutes. In another mixing bowl, combine the prawns, shredded sweet potato, daikon, sesame seeds and the Thai basil. Pour the batter over all of this then mix with your hands until everything is covered in the egg mixture.
  2. Now the fritters are ready to be cooked. However if you throw the mixture in as is, it will break up and not cook together. Use a kitchen spider (large spoon with holes it it) to gently lower handfuls of the fritter mixture into the oil, making sure that the vegetables have cooked together, holding the fritters in one piece. Cook batches of the mixture one at a time for around 2-3 minutes in the oil, moving regularly to ensure an even cook. When ready remove from oil and leave to drain on kitchen roll.
  3. Meanwhile make your Nham jim dipping sauce, fresh is always best with a lime juice based product. In a pestle and mortar, pestle the coriander root, garlic then chillies in this order to a coarse paste, using sea salt as an abrasive if necessary. Next add the caster sugar and pound for a few seconds using the sugar as a second abrasive. Lastly add the lime, mandarin juice and fish sauce to make the dipping sauce. It should taste sweet, salty, sour and hot, adjust seasoning accordingly. An exact recipe is impossible as ingredients strengths change constantly.
  4. Serve the fritters garnished with some fresh Thai Basil leaves and enjoy.

Lightly Spiced Tiger Prawn, Sweet Potato, Daikon & Thai Basil Fritter, Served With a Green Nham Jim Dipping SauceThanks very much for stopping by at ‘Articuleat’ and I hope you have enjoyed your stay. I always look forward to your feedback so please don’t hesitate to get in touch for any reason whatsoever – I will reply as swiftly as possible.

See you next time,

Cheers,

Sebbyholmes